sugar cookies cut out can be deceptively tricky: one batch holds crisp edges, the next puffs, spreads, or turns dry before you even reach the icing. If you want that bakery-style look, you need a dough that rolls clean, bakes flat, and stays tender enough to bite through without crumbling.
This guide gives you a reliable cut-out sugar cookie recipe, plus an icing method that dries smooth and stacks well. I’ll also call out the small “why did no one tell me this” details, like when to chill, how thick to roll, and what to do when your dough feels perfect… until it hits the oven.
Why cut-out sugar cookies spread (and how to stop it)
If your shapes come out looking a little “melted,” it’s usually not your cookie cutter’s fault. In most kitchens, spreading comes from fat getting too warm before the structure sets.
- Butter too soft: It creams fast and feels nice, but warm butter can cause wider cookies. Aim for cool room-temp butter, pliable but not greasy.
- Not enough chilling: Resting dough helps flour hydrate and butter firm up. It also reduces cracks when you roll.
- Too much sugar or leavening: Sugar liquefies as it heats, baking powder creates lift. For clean edges, keep leavening minimal.
- Thin rolling: Very thin dough bakes fast and can warp. A slightly thicker cookie keeps a sharper outline and stays softer inside.
According to USDA Food Safety and Inspection Service, perishable foods (including egg-based dough) shouldn’t sit at room temperature for more than about 2 hours, so chilling also helps you stay on the safe side during longer decorating sessions.
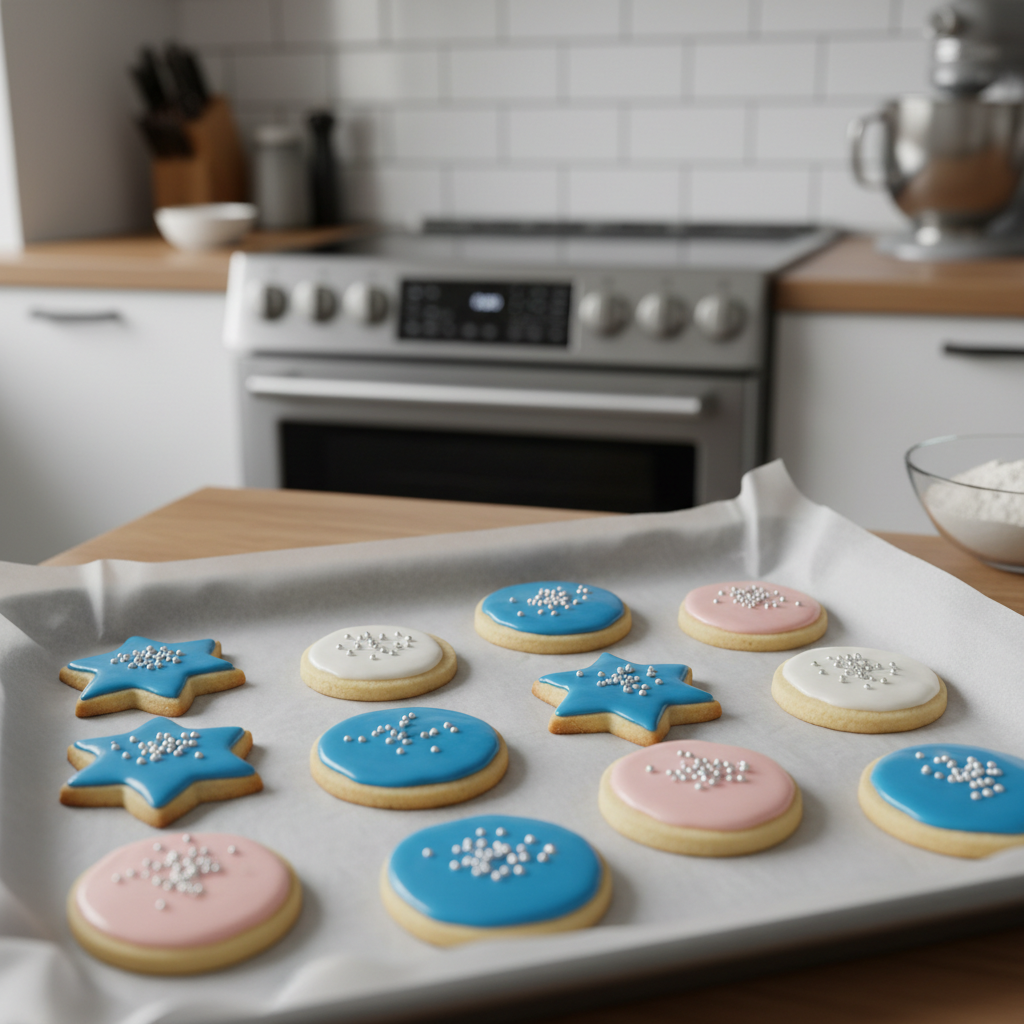
The iced cut-out sugar cookies recipe (reliable, beginner-friendly)
This formula is built for sugar cookies cut out with clean edges and a tender bite. You’ll chill twice: once after mixing, and briefly after cutting shapes. That second chill is what many people skip, then wonder why their gingerbread man looks like he ran a marathon.
Ingredients (cookies)
- 3 cups (360g) all-purpose flour, plus extra for dusting
- 1/2 tsp fine salt
- 1/2 tsp baking powder
- 1 cup (226g) unsalted butter, cool room temperature
- 1 cup (200g) granulated sugar
- 1 large egg
- 2 tsp vanilla extract
- Optional: 1/4 tsp almond extract for a bakery-style note
Instructions (cookies)
- Mix dry: Whisk flour, salt, and baking powder in a bowl.
- Cream: Beat butter and sugar 2–3 minutes until smooth and lighter in color, not fluffy like cake frosting.
- Add wet: Beat in egg and vanilla (and almond extract if using) just until combined.
- Bring dough together: Add dry ingredients and mix on low until no dry flour remains. If it looks shaggy, that’s fine, finish with a spatula.
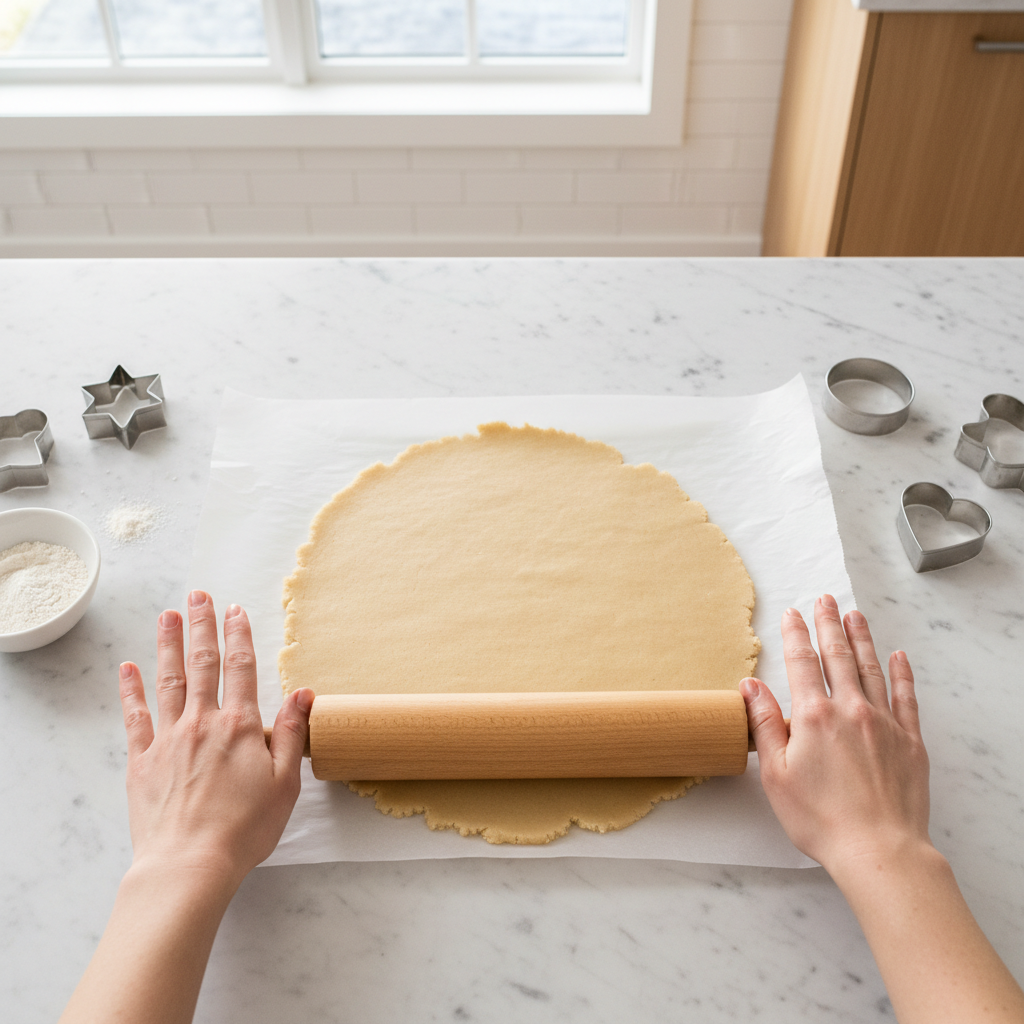
- Chill: Divide dough into 2 discs, wrap tightly, chill 1–2 hours (or overnight).
- Roll: Roll dough between parchment sheets to 1/4 inch thickness. (This thickness is a sweet spot for definition and softness.)
- Cut shapes: Peel top parchment, dust lightly if needed, cut shapes, transfer to a lined sheet.
- Chill again: Chill cut cookies 15–25 minutes while oven heats.
- Bake: Bake at 350°F for 9–11 minutes. Pull when edges look set but not browned.
- Cool: Rest on pan 5 minutes, then move to rack to cool completely before icing.
Quick dough troubleshooting (before you waste a batch)
This is the part people wish they had five minutes earlier. If your dough feels “off,” here’s what it usually means, and what to do next.
- Too sticky to roll: Chill 20–30 minutes, then roll between parchment with a light dusting of flour.
- Cracking at the edges: Dough may be too cold. Let it sit 5–10 minutes, then roll again with gentle pressure.
- Cut-outs won’t lift cleanly: Dust cutter in flour, or chill rolled dough 10 minutes before cutting.
- Cookies taste dry: Often overbaking. Pull earlier and let carryover heat finish the set.
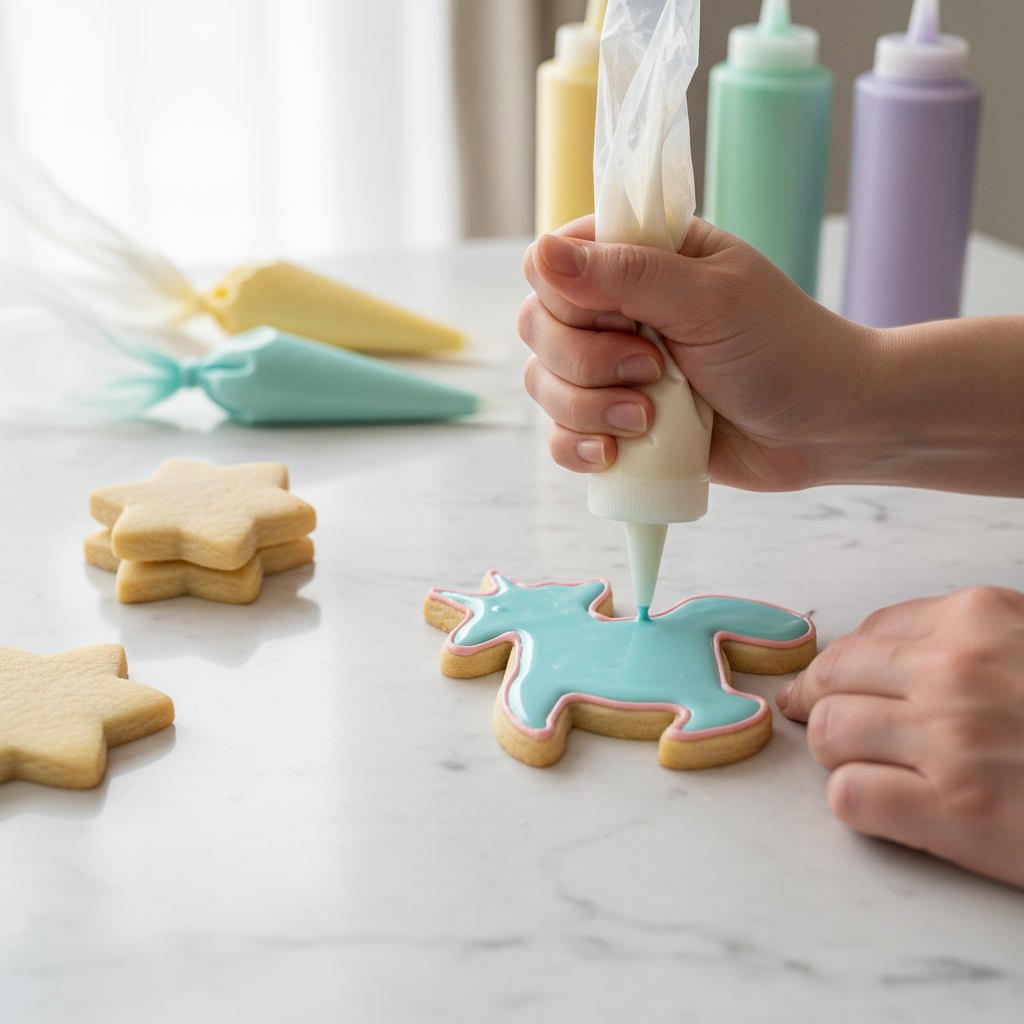
Icing options: easy glaze vs royal icing (and when to use each)
Most people say “iced” and mean “pretty, smooth, and not a sticky mess by tomorrow.” You have two practical routes.
Option A: simple cookie icing (great for beginners)
- 2 cups (240g) powdered sugar
- 2–3 tbsp milk (or water), added slowly
- 1 tbsp light corn syrup (optional, adds shine and smoother set)
- 1 tsp vanilla or lemon extract
Whisk until thick but pipeable. If you lift the spoon, the ribbon should disappear back into the bowl in about 10–15 seconds. Color with gel food coloring for brighter tones without thinning.
Option B: royal icing (best for sharp designs and stacking)
Royal icing dries harder and cleaner. It’s the go-to for detailed decorating, especially if you’re making sugar cookies cut out for shipping or gifting.
- 3 cups (360g) powdered sugar
- 2 tbsp meringue powder
- 5–7 tbsp warm water (adjust for consistency)
- 1 tsp vanilla (optional)
Beat until glossy and thicker than you think you need, then thin small portions for flooding. According to FDA, raw egg products carry food safety risk, so many home bakers prefer meringue powder rather than fresh egg whites, especially when kids will eat the cookies.
Consistency cheat sheet (table you’ll actually use)
Icing consistency is where good intentions go to die. Use this quick table to dial it in without guessing.
| Use | Consistency | Visual test | Common fix |
|---|---|---|---|
| Outline / piping | Thick | Holds a peak, lines stay raised | Add powdered sugar 1 tbsp at a time |
| Flooding | Medium | Ribbon blends in 10–15 seconds | Add water or milk, a few drops at a time |
| Wet-on-wet details | Medium-thin | Blends in 5–8 seconds | Thin slightly, then let base sit 1–2 minutes |
| Writing / fine lines | Thick | Doesn’t spread after piping | Stop thinning, switch to gel color |
Practical decorating workflow (so you don’t feel behind all day)
If decorating feels chaotic, it’s usually because everything happens at once: warm cookies, runny icing, and colors drying in the bowl. This workflow keeps it calm.
- Day 1 (optional): Make dough, chill overnight. Flavor improves a bit, and rolling gets easier.
- Bake day: Bake, cool completely, mix icing while cookies cool.
- Batch your colors: Start with light shades, then go darker to avoid washing bowls repeatedly.
- Outline, then flood: For royal icing, outline with thick icing, flood with medium. Pop bubbles with a toothpick.
- Dry time: Many kitchens need 6–12 hours for a firm dry, sometimes longer if humidity is high.
Key point: If you’re stacking cookies, wait until the icing feels hard and cool to the touch, not just “not wet.”
Common mistakes with iced cut-out cookies (and what to do instead)
- Over-flouring the dough: It fixes sticking but can make cookies tough. Roll between parchment and use minimal dusting.
- Skipping the second chill: This is the quiet reason shapes blur. Chill the tray before baking.
- Turning up the heat to bake faster: Higher heat sets edges too quickly and can brown bottoms before centers set.
- Using liquid food coloring: It can thin icing fast. Gel colors give stronger color with less mess.
- Decorating warm cookies: Icing slides and turns dull. Cool fully, then decorate.
Wrap-up: clean shapes, smooth icing, less stress
If you want sugar cookies cut out that look sharp and ice beautifully, focus on two things: dough temperature control and icing consistency. Everything else, fancy tools included, comes after that.
Pick one next action: either chill your cut cookies on the tray before baking, or mix icing to a true outline-and-flood consistency using the table above. Those two changes usually move results from “homemade” to “giftable” fast.
FAQ
Why do my cut-out sugar cookies lose their shape even after chilling?
Often the butter started too warm, or the dough got worked and warmed during rolling. Try rolling between parchment, then chilling the cut shapes 20 minutes right on the baking sheet.
What thickness is best for iced cut-out cookies?
About 1/4 inch tends to bake evenly, hold detail, and stay tender. Thinner can look sharp but dries out faster, thicker can need longer bake time and risks browning.
Can I freeze sugar cookie cut-out dough?
Yes, many bakers freeze dough discs well-wrapped for a few weeks. Thaw in the fridge overnight so the texture stays even and you avoid condensation making it sticky.
How do I know when cut-out sugar cookies are done?
Look for a matte surface and set edges with little to no browning. If you wait for golden color, they often end up crisper than intended.
Is royal icing safe if I don’t use raw egg whites?
Royal icing made with meringue powder is commonly used for home baking. If you have specific health concerns, it’s smart to check with a medical professional, especially for young children or immune-compromised family members.
Why does my icing crack after it dries?
Cracking can happen when icing dries too hard or too thick, or when the cookie flexes as you move it. Slightly thinner flood icing and full drying time before stacking usually help.
How far ahead can I ice and store decorated cookies?
In many home setups, fully dried cookies keep well for several days in an airtight container. Humidity, fillings, and frosting type change the timeline, so check texture after day two and avoid refrigeration unless needed.
If you’re baking for an event and want a more predictable workflow, consider doing a small “test run” with two shapes and two icing consistencies the week before, it’s the fastest way to spot how your oven and humidity behave without betting the whole batch.